
 | |
|---|---|
|
Miercuri Mai 20, 2026
|
| |
|---|
Getting started with selections |
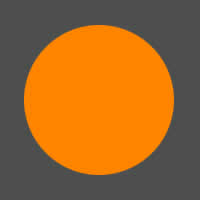
1. Using some of the selection features can come in very handy when you wish to add highlights, subtract part of the image, etc. The first step we need to do is to have something to play with. What I did here was to make a new 200 x 200 .psd and use a grey background and then I created an orange circle on a new layer. You want to almost always work on new layers above the background layer when creating images. Ok, lets make our background and circle on a new layer and get started.
|
2. Once you have your image ready Ctrl+Click on the layer with the sphere
on it to select it. Once it is selected (make sure the Marquee tool is
selected in your tool bar) grab your Marquee tool and hold down your
Shift key while dragging. Holding down the shift key allows us to "add"
to our selection. Where ever you drag on or outside of your original
selection will be expanded. This is good if you want to make some cool shapes.
Once it is selected all you would need to do is fill it with the paint bucket to
make it one solid color.
|
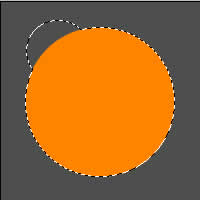
3. Now Ctrl+Click on your sphere layer again and the selection will go back to being the original selection (as long as you didn't fill it with the paint bucket). Now hold down your alt key while dragging and we will subtract that whole area from our selection. I use this technique a lot when I want to add highlights to a certain area of an image. Let's do that right now. Subtract your selection so it looks like the one I have here.
|
4. Now create a new layer above the orange sphere and fill it with white. It is important to always work on a separate layer when highlighting using this method. If we had everything on the same layer it would be next to impossible to blur the image correctly so it looks like a real highlight. Speaking of that lets go
|
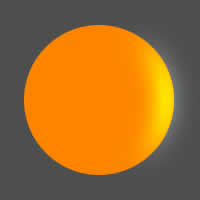
5. Now that we have our white slice on a separate layer go ahead and hit Ctrl+D to deselect it. Then change the layer mode to color dodge and go to Filter/Blur/Guassian Blur and use a setting of about 12. That looks pretty good. It looks like there is some light coming from the right side hitting our sphere and making it glow. But you know what? When we blurred it we got some blurring on the outside and it is starting to bug me. Time to get rid of that.
|
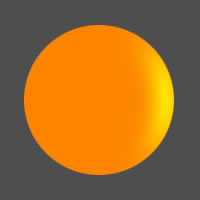
6. Go back and Ctrl+Click on your sphere layer to select it (making sure you stay working on your layer with the white slice we just blurred). Then hit Ctrl+Shift+I to inverse the selection. And making sure you are working on the layer with the slice (not the sphere) hit your delete key. Ahhh, that's better. Nice and clean just the way we like it. These are just a few tricks to using the selection tool. There are a ton more but experiment around with these for a while...
|
All Images and content © 2001-2002 pankpages.com / teamphotoshop.com |